
Steps to configure network bridge mode on A588
Step 1: Connect to A588 via SSH
Before configuring the network bridge, connect to A588 through SSH. This allows the network configuration to be performed remotely from another computer on the same network. You also can configure it by connecting A588 to the monitor using HDMI cable.
Open Windows Powershell and run:
ssh<username>@<A588-IP-address>
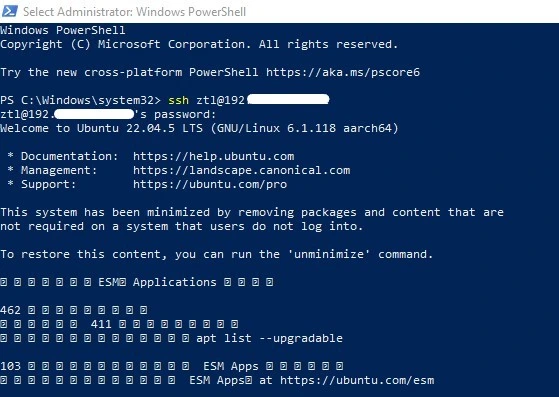
After entering the correct credentials, the terminal prompt will change to A588 system, indicating that the SSH connection has been established successfully.
Step 2: Identify the Network Interfaces
Before creating the network bridge, identify the available network interfaces on A588.Run the following command:
ip -br link
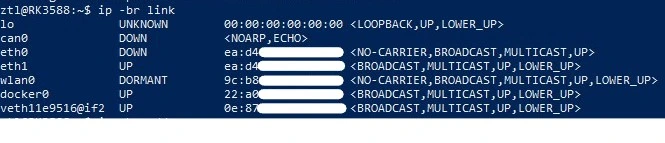 This command displays a brief summary of the network interfaces and their current status.
Identify the two Ethernet interfaces that will be used for the bridge. In this setup, A588 provides eth0 and eth1, which will alter be added as bridge ports.
Step 3: Check the Current IP Configuration
Before modifying the network configuration, check the current IP addresses and routing information.
Run:
ip -br addr

Then check the routing table:
ip route

These commands provide a reference of the existing network configuration before the bridge is configured.
Step 4: Check Existing NetworkManager Connections
NetworkManager is used to manage the network configuration on A588. Before creating a new bridge, check the existing connection profiles.
Run:
nmcli connection show
OR
nmcli -f NAME,TYPE,DEVICE,AUTOCONNECT connection show
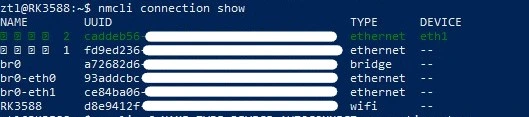
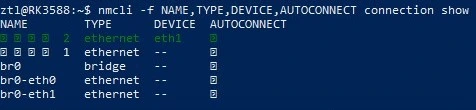
This step helps prevent duplicate bridge profiles from being created if a previous bridge configuration already exists.
Step 5: Verify That A588 is Not Running a DHCP Server
Before configuring the bridge, verify that A588 is not operating as a DHCP server.
Run:
sudo ss -lunp | grep ':67' || echo "No DHCP server detected"

UDP port 67 is commonly used by DHCP servers. In this setup, IP address assignment should remain the responsibility of the upstream router rather than A588.
Step 6: Create the Network Bridge
Create a new bridge interface named br0 using NetworkManager:
sudo nmcli connection add type bridge ifname br0 con-name br0

A successful configuration will return a message indicating that the bridge connection has been added.
Note: The screenshot is an example of the expected command and output. The bridge on the test device had already been configured before this documentation was prepared.
Example output:
Connection 'br0' (xxxxxxxx-xxxx-xxxx-xxxx-xxxxxxxxxxxx) successfully added.
Step 7: Add the Ethernet Interfaces to the Bridge
Add both physical Ethernet interfaces to br0.
Run:
sudo nmcli connection add type ethernet slave-type bridge ifname eth0 master br0 con-name br0-eth0
Then add the second Ethernet interface:
sudo nmcli connection add type ethernet slave-type bridge ifname eth0 master br0 con-name br0-eth1
Both Ethernet interfaces will now operate as ports of the same Layer 2 bridge.
To verify:
nmcli -f NAME,TYPE,DEVICE, connection show
Physical Network Connection Before Activating the Bridge
The bridge configuration can be created before the physical network connections are established. However, it is recommended to complete the required physical connections before activating the bridge especially when A588 is being configured remotely through SSH.
A typical connection is:
Upstream Router / Network
|
eth0
|
br0
|
eth1
|
Downstream Device
Once eth0 and eth1 are configured as bridge ports, A588's network management IP should be handled through the br0 interface rather than an individual bridge port.
If the bridge is activated before an upstream DHCP server is reachable, br0 may not obtain an IP address. When configuring A588 through SSH, this may cause the SSH session to disconnect and remote access to the device to be temporarily lost.
Therefore, ensure that the upstream network connection and DHCP service are available before activating and testing the bridge. Local console access is also recommended during the initial activation in case the network configuration needs to be restored.
Step 8: Configure the Bridge to Obtain an IP Address
Configure br0 to obtain its IPv4 configuration automatically from the upstream DHCP server.
Run:
sudo nmcli connection modify br0 ipv4.method auto
After that run:
nmcli connection show br0 | grep ipv4.method
You should see:
ipv4.method: auto
This ensures that A588 does not assign addresses to downstream devices. Instead, the existing upstream DHCP server remains responsible for IP address allocation.
Step 9: Activate the Network Bridge
Activate the bridge and its Ethernet ports.
Run:
sudo nmcli connection br0
Then activate both bridge ports:
sudo nmcli connection up br0-eth0
sudo nmcli connection up br0-eth0
Note: If the configuration is performed remotely through SSH, the SSH session may temporarily disconnect while the network interfaces are being reconfigured.
Step 10: Verify the Bridge Configuration
After activating the bridge, verify that the configuration is working correctly.
Check the IP addresses:
ip -br addr
Check the routing table:
ip route
Verify the interfaces attached to the bridge:
ip link show master br0
Finally, check the active NetworkManager connections:
nmcli -f NAME,TYPE,DEVICE connection show --active
If eth0 and eth1 are attached to br0 and the bridge has obtained the expected network configuration, the bridge setup is complete.